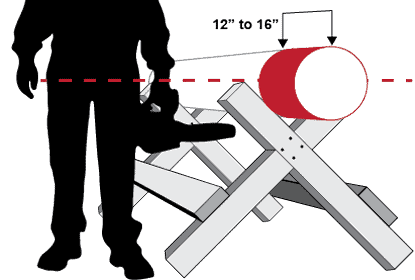
The first step in turning logs into firewood is cutting each log into smaller equal-length pieces called rounds. Each round is typically between 12 and 16 inches long depending on your fireplace or wood stove size. The process of reducing a log into rounds is called bucking. As with most repetitive logging tasks, a special jig/tool is used to increase efficiency and reduce fatigue. This tool, commonly called a sawbuck or log horse, has been used for centuries and can vary in size and complexity.
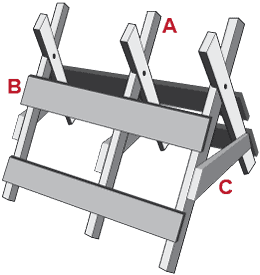
Sawbuck: Two or more evenly spaced, and parallel braces joined together with perpendicular cross bracing to support a log during the cutting process. Originally created for use with a manual crosscut saw or ax, the sawbuck works great with chainsaws too.
A sawbuck is commonly made up of two or more “X” shaped braces that are evenly spaced and cross-braced for stability to support a log at or below waist height for cutting. The log is placed across the top “V” shaped pockets of the “X” braces, wedging itself into the notch under its own weight. This reduces turning or shifting during cutting without using mechanical fasteners. The elevation of the log off the ground to waist height provides optimal cutting egonomics for both manual crosscut saws and chainsaws.
Today, sawbucks can be purchased in a wide variety of materials and configurations, but you can easily make one from a variety of materials.
Why use a sawbuck
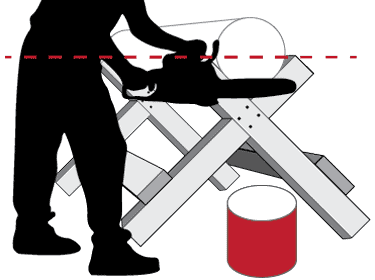
A sawbuck greatly reduces fatigue when bucking a lot of wood. Elevating the log off the ground makes it easier to cut without bending over. Properly set up, the sawbuck allows the chainsaw to do all the work, using gravity to pull it through the wood. The user should be able to place the saw on top of the log and guide it through the cut using minimum to no downward pressure. When the user’s arms are near full downward extension the cut should be completed.
Additional benefits of using a sawbuck:
- Supporting the log at multiple points behind the cut makes it less likely to bind the saw.
- The user is able to position the saw to the right side of their body for increased safety.
- Elevating the log prevents grounding and dulling the saw’s cutters.
- Saves your back
How to make a basic sawbuck
There are many ways to construct a sawbuck using pallet wood, logs, traditional dimensional lumber, and even metal. What you use will depend on what you have on hand, your budget, and whether it needs to be portable. Regardless of the material, a sawbuck needs to be sturdy and at the correct height to be efficient and safe to use.
The foundation of a good sawbuck is the interlocked “X” shaped braces. The “X” can be created by crossing and joining two pieces of material together roughly ⅓ from their top.
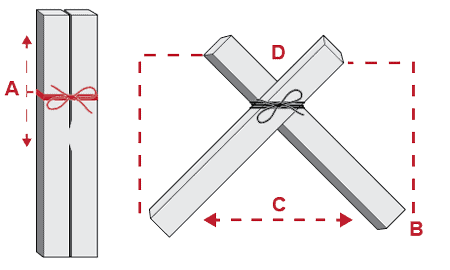
Mockup the first brace using a piece of string or rope to temporarily hold the “X” brace together. Slip the string up and down to work out the optimal height and top-notch capacity to meet your needs. The bottom “V” of the “X” brace should be wider than the top “V” to create a sturdy base. The bottom of the top “V” should be below waist height so that the center of the log is even with your belly button. The objective is to be able to cut the log without bending over.
Once you have the mockup dialed in, use appropriate fasteners to lock it into position. Use this brace as a template to create additional braces.
It is only necessary to have two “X” braces in total, but three or more is ideal when cutting long logs. The extra braces will provide additional support for the log, making it less likely to pitch up under an uneven load. Space out the “X” braces evenly and attach lateral cross-bracing to keep everything ridged and inline.
How to use a sawbuck
Sawbucks are designed to hold and support logs or large branches using a series of equally spaced “X” shaped braces. Logs should be positioned so that the desired length of wood (the round) is protruding from one end. After the round is cut, advance the log by the desired length and repeat the process until the log is the same length as the sawbuck. At this point cut the log in between sets of braces for maximum stability.
Most chainsaws are right-handed. As a result, the operator should position the cutting end of the sawbuck to their right so that they are standing alongside the length of the log. This allows the user to monitor the cut without looking over the blade and the rounds to fall away from the operator.
If at any time the log or sawbuck tip back to one end, reposition the log or shorten it so that it is stable end to end and side to side. Never cut an unstable log!
Safety considerations
A sawbuck is not a replacement for proper safety equipment and experience. Chainsaw chaps, gloves, eye, and ear protection are a must whenever using a chainsaw. Complacency kills, while a sawbuck makes the job less physically demanding, the repetitive nature can give users a false sense of security. Make each cut with purpose and your full attention.
Never lift more than you are comfortable with. The whole purpose of a sawbuck is to reduce fatigue and the strain on your back. Lifting extremely heavy logs onto a sawbuck defeats the point and can lead to serious injury.
Never use a right-handed saw like it was left-handed! Even with a full wrap handle, this is extremely dangerous. There is a reason the bulk of the engine is between the user and the blade. It creates space between you and the cutters. Hopefully, in a kickback situation, the saw will be far enough to the operator’s right to miss them entirely.